Once you have created a virtual environment and activated it, it’s time to install the packages we will be using.

Step 1: Install packages
We will be using Flask, of course. As a micro-framework, we will need a few extensions to, well, extend it.
First and foremost, we need Flask-WTF to handle forms. In modern web development, forms should always be defined server-side with something that will protect your forms from cross-site request forgeries. It’s not listed as a dependency, but if your forms collect email addresses (like signup or login forms do), you will also need the email-validator library for Flask-WTF to work.
We will also be using Flask-Session for session management. Some tutorials will recommend installing Flask-login to handle logins, but we are going to be using Supabase for that, instead. Let’s go ahead and add Strip to our list as well. We won’t need this for a few days, but might as well add it now.
And finally, we will be installing a package called decouple. Decouple allows us to create multiple configuration classes based on the system environment, which will let us define test and production keys. It also let’s us avoid using the Python-dotenv library, although the Flask development server will throw a warning about this.
Now, that’s a lot of packages, but we can install them all at once. Rather than typing everything, just copy and paste the line below. Typos in pip installs can allow malware to be installed in your app.
pip install flask flask-session Flask-WTF Supabase Stripe email-validator python-decoupleStep 2: Create your configuration file
Open up VSCode or the IDE of your choice and open the project folder and create a file called config.py and paste the following code into it:
import os
from decouple import config


class Config(object):
    DEBUG = False
    CSRF_ENABLED = True
    FLASK_SECRET_KEY = config("SECRET_KEY")

    def define_upload(self):
        self.UPLOAD_FOLDER = self.UPLOAD_FOLDER
        os.makedirs(self.UPLOAD_FOLDER, exist_ok=True)


class DevelopmentConfig(Config):
    DEVELOPMENT = True
    DEBUG = True
    UPLOAD_FOLDER = os.path.join("src", "upload_folder")
    STRIPE_KEY = config("STRIPE_TEST_KEY")
    STRIPE_PUBLISHABLE_KEY = config("STRIPE_TEST_PUBLISHABLE_KEY")


class ProductionConfig(Config):
    DEBUG = False
    STRIPE_KEY = config("STRIPE_LIVE_KEY")
    STRIPE_PUBLISHABLE_KEY = config("STRIPE_LIVE_PUBLISHABLE_KEY")
    UPLOAD_FOLDER = os.path.join("/tmp", "upload")


class StagingConfig(DevelopmentConfig):
    UPLOAD_FOLDER = ProductionConfig.UPLOAD_FOLDER
config classes based loosly on those shown in FreeCodeCamp’s user authentication in Flask tutorial
So what’s going on here?
To start, we are create a base Config class that sets DEBUG to False and enables a CSRF token, and says where to find the secret key for Flask. You’ll notice it’s defined with config() instead of os.environ[]. This tells the code to use decouple’s (see it imported at the top) config function to read the environment variables instead.
We also have a method for creating the upload folder.
Next we have DevelopmentConfig, which swaps everything we just set up and flips it on its head, while setting the DEVELOPMENT key to True. We also set the Stripe keys to the test keys found in the .env file, with a default value of “guess me”
Next we have a ProductionConfig class, which defines the upload folder to /tmp based on how it works in Google Cloud Platform, and sets the Stripe keys to the live versions.
And StagingConfig is for staging environment, which will need to work like development, except have ProductionConfig’s upload folder. Don’t worry too much about this just yet, we will get to it in more detail later.
Step 3: Create a .env file
We don’t need much in here just yet. For now, Create two variables, FLASK_ENV and FLASK_SECRET_KEY. Set FLASK_ENV to development.
Then in the terminal, type python to enter the interactive python environment. You will know you are there when the prompt changes to three chevrons >>>
You can exit interactive mode by typing exit()
But first, import the secrets module. Then enter secrets.token_urlsafe(24)
python
Python 3.12.0 (tags/v3.12.0:0fb18b0, Oct  2 2023, 13:03:39) [MSC v.1935 64 bit (AMD64)] on win32
Type "help", "copyright", "credits" or "license" for more information.
>>> import secrets
>>> secrets.token_urlsafe(24)
This will create a 24 character random key to use as your FLASK_SECRET_KEY. 24 characters works out to 192 bits, which is the default encryption for Flask. I’m a big fan of using token_urlsafe for keys, because I don’t have to worry about escaping anything.
When done, you will have a file that looks like this:
FLASK_ENV=development
FLASK_SECRET_KEY=Y8b3fctA0-q-2i49zwCEO4GhtMI9hgr7
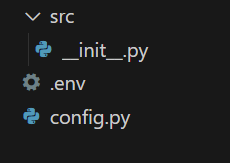
So now, we have a .env file and a config.py file in our project root. Next we are going to create a folder called src and a filed __init__.py inside the src folder, like this:

In Python, you create a library by putting an __init__ file in a folder. This src library will be the home of our Flask application, and this initialization file is where we will do the initial setup of it.
At it’s most basic, you create a flask app by importing the Flask module from the flask library and then initializing an instance of it (usually with the name app).
from flask import Flask

app = Flask(__name__)
From there, you could run the development server, and have a Flask application! Of course, it doesn’t do anything yet. So, let’s add a bit more.
Next, we will add our configuration setup, by importing the config module from the decouple library and then importing our config classes from our config module.
We will also define an env_config dictionary of our configuration classes and easily idefitiable keys, one of which will be stored in our .env file under FLASK_ENV (you’ll recall, we currently have FLASK_ENV set to development, which means we will be using the DevelopmentConfig class).And finally we will instruct our Flask app to load the variables from the associated configuration class.
from decouple import config
from flask import Flask

# Config classes for environment variables
from config import DevelopmentConfig, TestingConfig, StagingConfig, ProductionConfig

app = Flask(__name__)

env_config = {
    "development": DevelopmentConfig,
    "testing": TestingConfig,
    "staging": StagingConfig,
    "production": ProductionConfig
}

# Load environment variable for flask environment configuration class
config_name = config("FLASK_ENV", default="development")
app.config.from_object(env_config[config_name])
At this point, our app still doesn’t do anything, but we at least have a good foundation to start building. Next, we will start working on blueprints, which is how Flask organizes larger apps into more functional units.
