In Flask, blueprints are a way of organizing your app into functional units. Rather than having one giant templates folder with hundreds of html files, and a single app.py file with dozens or hundreds of routes, you can split them up based on what they do. It took me a minute to really understand the concept, but that’s really how you have to think about blueprints, as conceptual units.

I’ve seen blueprints explained as organizing your Flask app based on what the app does. But that’s not quite right. Not really. A better way to think of it is as organizing the app based on what the user does with the app.
For my ProsePal app, I have five blueprints, core that handles static pages (static is a reserved name in Flask), accounts that handles things like signups, login and logout, and letting user’s manage their account information, free where my free apps go, paid where the paid products go (see what I mean by conceptual units?), and then a final one to handle payments with Stripe.
You may be asking why we don’t have a blueprint for Supabase then. The answer is because your users (frontend) will be interacting with Stripe, but only Flask (backend) will be interacting with Supabase. While blueprints are a part of Flask, and, therefore, the backend logic, they are a method of organizing how the frontend is set up.
Now, if a library is just a folder in Python with a specific file, then a B\blueprint is a folder in Flask with specific line of code. Same general principle.
But to start off we are going to create a couple folders.
Actually. Back up. To start off, we are going to talk about structures.
Flask blueprint structures
There are two main structures for Flask Blueprints, functional and divisional.
Functional Blueprints
Now, everything is all just folders, remember. And blueprint structures just are a way of sorting what files go in what folders. A functional blueprint makes outer folders based on function (note: not function not functions). So there is one folder for views, one for forms, another for templates, and then each folder then gets a file named after the blueprint.
src/
├── __init__.py
├── forms/
│   ├── account_forms.py (account specific forms)
│   ├── core_forms.py (core specific forms)
│   └── paid_forms.py (paid specific forms)
├── views/
│   ├── accounts.py (account related routes and logic)
│   ├── core.py (core related routes and logic)
│   └── paid.py (paid related routes and logic)
├── static/      (global static content)
└── templates/
    ├── accounts/  (account templates)
    │   └── ...
    ├── core/      (core templates)
    │   └── ...
    └── paid/       (paid templates)
        └── ...
Divisional Blueprints
Divisional blueprints go the other way. They say, what we really want to organize by is the blueprint. The folders are named for the blueprint, and then the files inside are named for the function.
src/
├── __init__.py
├── accounts/
│   ├── __init__.py
│   ├── forms.py
│   ├── views.py
│   └── templates/
│       └── ...
├── core/
│   ├── __init__.py
│   ├── forms.py
│   ├── views.py
│   └── templates/
│       └── ...
├── paid/
│   ├── __init__.py
│   ├── forms.py
│   ├── views.py
│   └── templates/
│       └── ...
├── static/
└── templates/
    └── base.html
It’s up to you which you prefer, but, personally, divisional structure makes more sense to me and create more flexibility, so that’s what will be used in this tutorial.
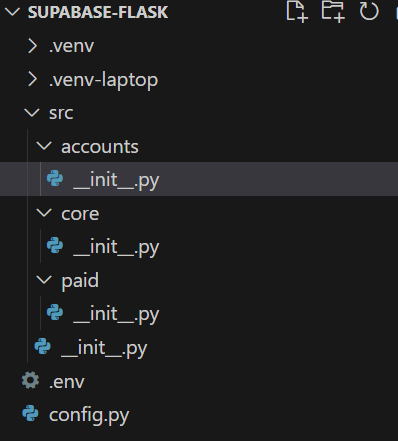
To start off, we will keep things simple. We will have three blueprints. core to keep our static pages/routes, accounts to handle account related stuff, and paid for our actual SaaS app. We will need to create another one for Stripe, but we can worry about that when it is time to integrate the payment processor.
So now we are going to create some folders. As you can probably guess from the examples, we will have three blueprints to start, accounts, core, and paid. So, let’s create three folders inside our src directory and put an empty __init__.py file in each one.

We’ve created a library for each blueprint in our Flask app. Now it’s time to turn them into actual blueprints.
Creating a blueprint
In each of these three libraries, create a views.py file and add the following code, changing blueprint_name to the name of your actual blueprint, in this case either accounts, core, or paid.
from flask import Blueprint

blueprint_name_bp = Blueprint("blueprint_name", __name__, template_folder="templates")
We are importing the Blueprint class from Flask. Then we are initializing an instance of the class under a variable name. By convention, we use the blueprint’s name followed by the letter’s bp, in snake case, but you can call it whatever you want. While initializing the instance, you pass the name of the blueprint, the import name, and the template folder path as arguments.
__name__ tells Python to refer to the name argument when it needs the import name. The template folder path will be relative to the blueprint’s root path. If you were using a functional structure for your blueprints, you wouldn’t use the template_folder argument, because your templates wouldn’t be in a folder that was relative to a blueprints folder.
There are other arguments you can pass as well. I’m not in the habit of splitting up my static files by blueprint. Almost all of them are used by multiple blueprints, so it doesn’t make sense to me. But you could set static_folder and have your static files for your blueprint’s pages served from within the blueprint. There are other options as well, such as setting a nested directory structure, like putting the accounts pages under https://yourapp.com/accounts/ but you can also do this within the route definition. Another option is if you wanted to set the pages for a route within a subdomain.
You can see all of the parameters available in the Flask documentation. While I would love if all of the parameters had practical examples, as far as docs for a library go, Flask’s are really pretty extensive.
Registering the blueprint
Now that we have our three views.py files, one in each blueprint folder, it’s time to register the blueprints with the app itself. To do that, we need to edit the __init.py file in the src directory. Registering a blueprint involves 2 steps:
- import the blueprint variable you assigned the class instance to
- call the
register_blueprintmethod of your Flask instance with the variable as an argument
So now our src/__init__.py file looks like this:
from decouple import config
from flask import Flask

# Config classes for environment variables
from config import DevelopmentConfig, TestingConfig, StagingConfig, ProductionConfig

# Import blueprints
from accounts.views import accounts_bp
from core.views import core_bp
from paid.views import paid_bp

app = Flask(__name__)

# Register the blueprints
app.register_blueprint(accounts_bp)
app.register_blueprint(core_bp)
app.register_blueprint(paid_bp)

env_config = {
    "development": DevelopmentConfig,
    "testing": TestingConfig,
    "staging": StagingConfig,
    "production": ProductionConfig
}

# Load environment variable for flask environment configuration class
config_name = config("FLASK_ENV", default="development")
app.config.from_object(env_config[config_name])
Avoiding circular imports
What circular imports?
Good question, I’m glad you asked. 😉
Right now we don’t have any. But, all of our configuration settings are stored in app.config right now. Eventually, we will have routes in our views.py files that depend on those config settings. Access to our enviornment variables may eventually be routed through a Config class.
One example of routing environment variables through a Config class is your Stripe key. Stripe offers a test key and a live key. You can use the test key in development and when used in conjunction with some special false credit card numbers, you can test your payment systems without getting charged. So you can set STRIPE_TEST_KEY and STRIPE_LIVE_KEY in you .env file and then assign STRIPE_SECRET_KEY to STRIPE_TEST_KEY in DevelopmentConfig and STRIPE_LIVE_KEY in ProductionConfig.
If we hadn’t just imported something from these views.py files, we would just import app into views. But we can’t do that and import views into app. That’s a circular import, and creates an infinite loop of Python importing one module into the other forever until it crashes.
Instead, when you need to access app.config or some other method of your Flask instance, you instead will use a proxy called current_app. We will get into this more later, when we actually need it, but for now, just be aware, that when we import current_app from the flask library in a views module, we can use it in place of importing app and then use it exactly as you would if you add imported the app instance.
So instead of
STRIPE_KEY=app.config("STRIPE_SECRET_KEY")it would be
STRIPE_KEY = current_app.config("STRIPE_SECRET_KEY")And that’s it for today. Now that we have our configuration classes and blueprints set up, next, it’s time to set our sites on Supabase.
